
I’m about a year into using my astronomical video camera to view deep-sky objects from the city and capture small and simple pictures of what I see. All things considered the experience has been tremendous, but there was an obvious weak link: the mount that I bought does not track well.
This is not to say that the mount did not perform up to my expectations. In fact, given the relatively small amount of money that I paid the mount has been excellent. Good telescope mounts are hard to build well, and even harder to build cheaply.
That said, you can do better, and about six months in I decided that I would be doing this enough to consider how to do better. After my first investigations, I wrote this about the relationship between cost and quality in a mount:
In general you will find that in terms of mechanics you get what you pay for. There is a direct and linear relationship between how much money you spend and how well the mount will hold weight and smoothly track the sky with the least amount of fuss. When you spend more money you get more reliable machinery that is built to a higher standard of precision. Those gears in the motor drive will be asymptotically closer theoretical perfection. More importantly, by building in small numbers the premium manufacturers can maintain a tight hold on testing and quality control.
What this means to me is that you should start cheap, decide if you are serious, and if you are serious then go and buy your last mount ever. Mounts are like tripods in photography. If you are really serious about photography it’s well known that you will eventually spend $1500 on a carbon fiber tripod and a really good ballhead. The only question is whether you spend $3000 on inferior tripods before finally upgrading to the one you should have bought anyway.
Having started cheap and decided I was serious, the only question now was: which mount is the last one I want to buy. The choices before me were:
1. A more expensive Chinese mount. Here you have the CGEM from Celestron, and the various Synta mounts like the Orion Atlas. All of these have the same basic mechanics and manufacturing quality as the CG-5 that I had bought, but are built larger and heavier so they are more stable. I could not find a convincing case that the performance of this hardware is consistently good enough that I would not want to throw it away in a year. The Atlas and the CGEM also weigh almost 40 pounds. More on this later. iOptron in Taiwan also makes a mount in this class, but which is lighter.
2. Losmandy G-11. By all accounts this is an excellent piece of hardware. Unfortunately they’ve been in a two year death-march updating their control software, which does not fill me with confidence. The G-11 is also relatively large and heavy given the load that it can carry. Finally, there is a lot of Internet literature on do it yourself tweaks to this mount, which brings it down in my mind. But I’m not really being fair.
3. Takahashi EM-11 or EM-200. Here we are finally getting into the “just works and works forever” category. Beautiful fit and finish. Apparently great mechanics. Best polar alignment scheme in the business (more on this later). But, it requires a laptop for doing automatic pointing. And, the main documentation on the entire mount is a 10 page pamphlet poorly translated from Japanese into English. You can also only get service on this mount from a single company that is far away from me.
4. Astro-Physics Mach1. You saw this coming. Since this is the one I picked, I will now ramble on about it at length.
My pre-purchase justification for going with the Mach1 was as follows:
1. Weighs 30% less than the Chinese mounts but carries at least twice the weight.
2. Weighs about the same as the EM-200 but is more stable.
3. Extensive and competently produced documentation and support materials available on their web site.
4. Extensive and competently produced software support on the PC side if I want to go that way.
5. A few clever control features in the mount itself (more on this later).
6. Nearly 100% positive evaluation of the mount on the Internets.
7. Excellent Internet support. The owner of the company can be found doing remote diagnosis of issues on the mailing list. Impressive.
My main pre-purchase worries about the mount were:
1. Complicated to set up and polar align compared to the Tak, where you just point the polar scope and go.
2. Expensive.
3. Maybe a bit too large. The EM-11 is more my size, and would retain my “bring the mount and tripod out in one step” workflow.
4. Expensive.
Still, I had nothing to lose by putting my name on the waiting list (Astro-Physics makes two production runs of the Mach1 per year, one in the spring and one in the fall. So you put your name on a list and wait until the next run) while I deliberated further. By the time my name came up on the list six months later I had decided that $6000 on a mount is expensive, but not as expensive as spending $4000 now and then $6000 later when the first one didn’t work. Two weeks later four large boxes appeared at my house.
Here is what you can say about Astro-Physics, their excellent product photography does not do their products justice. At this point I should include a picture of the mount head, or the polar alignment adjuster knobs, or the keypad, or the wires that go from the control box to the motors or even the knobs that hold everything together. But, I lack the talent and technical ability to create an adequate picture. Every one of these items is built and finished to a degree of polish that I can only describe as good enough to make Apple jealous. I spent five minutes just turning the knobs on the Vixen style saddle. I had never seen machined knobs that were that good. Not even on my Really-Right-Stuff ballheads which until now were my standard for gratuitously expensive pieces of machined aluminum.
I spent the first night with the hardware just putting it together. There were lots of parts and knobs and whatnot. By the time I had it set up it was time to go to bed, even though the sky was clear. This is a hard situation to be in.
Happily over the next two weeks we had enough good weather in Pittsburgh for me to get the mount set up at night. Some impressions from the first setup:
1. Polar alignment was not bad. The polar scope is easy to use, and the clever “quick star drift” scheme outlined in the documentation works well. You can get set up in about 15 or 20min, which is the same time it used to take me with the CG-5′s computer. The adjustment knobs on the mount for altitude and azimuth are incredible. This is still more complicated than the Takahashi mounts with their superbly integrated polar scopes. On those you run a computer program that tells you where in the polar finder to put polaris and you just do it. You are done in five minutes.
2. The mechanics of the mount, in use, are practically perfect and absolutely predictable. With good polar alignment you can calibrate on a single star and afterwards every single GOTO goes exactly where you want. The CG-5′s alignment scheme, while clever, was never consistent. Some nights pointing would be perfect and other nights it would drift around unpredictably. You also have to memorize where six or seven bright stars are in your sky on any given night to make it work. The Mach1 only needs you to find one star.
3. When moving the mount with the keypad there is no apparent backlash in any direction. This is unlike the CG-5 where at slow speeds you’d have to wait a second or two for the gears to wind up before the mount would move.
4. The mount remembers the date and time. Hallelujah.
5. My one and only gripe so far: the clutch knobs can be hard to use because they are so close to the motor boxes. Oh, and the portable pier/tripod is not the easiest thing to fold up or adjust. That’s all I can think of.
I also got to set up with my camera. Here’s a single shot to give you an idea of how well the mount performed:
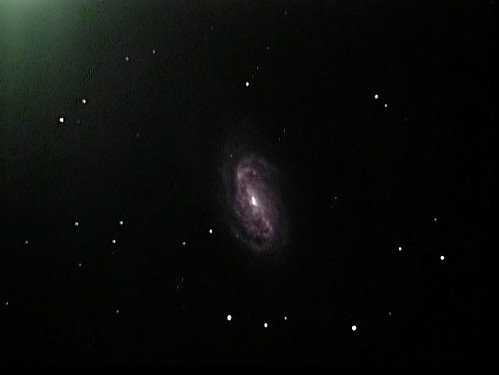
This is NGC2903 and the picture is a stack of 12 frames shot at 2 minutes exposure for each frame. The telescope was being used at 1000mm focal length. Every one of the 12 frames was perfect enough to use. The object barely moved on the screen after each exposure.
Just last month I shot this object with the old mount using my small refractor at around a 300mm focal length:
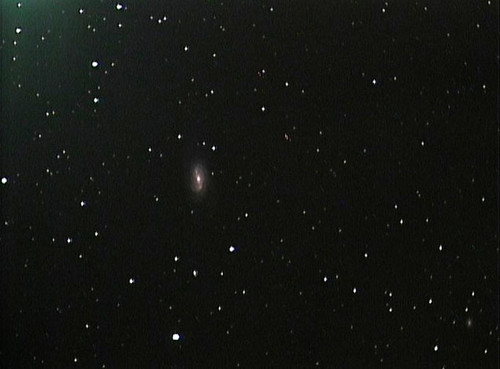
This is a stack of 1 minute frames at less than half the focal length as I used above. And the tracking is visibly worse.
“But you should be using a guider” you might say. And you’d be right. I should be using a guider to smooth out the raw tracking error in any mount. But guiders are notoriously finicky devices, and their ease of use, or lack thereof, is pretty much linearly related to the underlying performance of the mount they are guiding. So the way I see it, I’ve finally bought a mount that will be worth guiding, because the guiding will just work.
In my mind, this gets to the core value of this product. This is a product that defines the phrase “just works.” The behavior and performance of the mount is absolutely predictable. And the value of that is hard to measure.
“Value” is one of those buzz-words that makes the rounds of business meetings and marketing materials. I think in most cases it refers to something that a company would like you do believe you are buying, but in general it’s not the case. Most of the time when you spend more money you have just spent more money. It’s not often that you spend more money for something and when that something arrives you can stare at it and see the exact linear relationship between the money that you have spent and the value that you have gained. All I can say about the Astro-Physics Mach1 is that you can see every penny of it. It cost ten times more, and really is ten times better than the cheap mount that it replaced. You can’t say that about too many other products.
Sidebar Note about the Meridian
Only read this if you are a mount dork. By that I mean, stop reading now.
The Mach1 is an example of the so-called “German” equatorial mount. In this design the telescope sits on top of the declination axis and is counterweighted on the other side. Here is a poor schematic:

In this design the telescope and the counterweights are always on opposite sides of the pier. When the mount is properly aligned, the RA axis will point straight north, which means the pier will be right on top of an imaginary line that runs North/South right down the middle of the sky which we call the meridian. Another bad picture:

The issue with German mounts is that as you track closer to the meridian you can end up in one of two bad situations:
1. The weights or scope can hit the pier.
2. The weights can end up above the scope, which is bad for balance.
So avoid these things, the controller forces you to follow some rules. The main rule is that if the scope is pointing East its body should be on the West side of the mount and vice versa. This keeps things from hitting the pier and keeps the weights below the scope.
Which brings us back to the meridian. What the above rule means is that if we want to go from looking at things in the East to looking at things in the West we need to flip the scope over the mount so it’s on the opposite side:

This is a rather drastic and potentially destructive move. Things in your telescope can get out of alignment. You can catch wires on knobs. And, it can throw off your pointing. So, users of German mounts tend to try and avoid flipping at all costs. But, this is annoying since the exact time when you want to look at most objects is when they cross the meridian, because that’s when they are highest.
The Mach1 mount does a few things to make this better. First, the geometry of the mount allows it to track far past the meridian if you want it to. So you can pick up an object on the East side and follow it across its highest position in the sky without needing to flip anything around. Second, the build quality of the mount assures that when you do flip over, all you need to do to restore good pointing is to calibrate with the position of one bright star on the new side. I ended up always needing to do this with the Celestron mount anyway, even with all the fancy alignment software.
Finally, the control software in the mount allows you to shift where the mount thinks the meridian is, and thus delay or force flips when you want to. So, if you want to pick up an object that is 30min East of the meridian and track it until it is low in the West without flipping, you can tell the mount that the meridian is actually one hour further East than it really is. It will then dutifully flip the scope over as if the object is already in the West and then track it for hours without flipping. Just make sure nothing hits the tripod when you start this maneuver. If you are really a mount dork, you can read more about this here or in the AP documentation at their web site.
Astro-Physics even has a clever scheme that uses flips to make sure your polar axis is aligned (if you are aligned, a the mount will point to the same star in the same place from both sides of the meridian. So to fine tune the alignment, you flip the mount over on purpose and then adjust).
OK. I’m done.


