
Most of the background I have in producing my own pictures came in the black and white darkroom. As most people know, when you do black and white printing, there are a wide variety of manipulations that you can do in the darkroom. Among other things, you can manipulate overall and local print contrast (when using adjustable contrast printing papers) and you can also manipulate overall and local “lightness” and “darkness” using dodging and burning.
For many years, when I tried to use Photoshop to do these things, I never really found a scheme that I could understand using the normal editing tools. In particular, the dodge and burn tools are nothing like dodging and burning in a darkroom. After I got more serious about taking digital pictures, I finally realized what I had been missing: Adjustment layers.
The Big Picture
Adjustment layers let you do almost everything you used to do in the black and white darkroom. In addition, they work equally well in both black and white and color. Finally, they are non-destructive to the original image data, infinitely adjustable after the fact, and persistent, so you can always remember what you did.
The Basics
Photoshop has a set of built in global adjustments that correspond pretty directly to global adjustments that you can make in the darkroom. For example, in the darkroom, you can adjust how light or dark a print is by increasing and decreasing the exposure of the paper under the enlarger. In Photoshop, you can do this by adjusting the levels of the image. Similarly, in the darkroom you can adjust the overall contrast of a print by using a harder or softer contrast grade of paper (or by using multicontrast paper and changing filters). In Photoshop, you can do this using the curves adjustment. Curves is actually a richer tool than just changing paper, but it’s a reasonably good analogy. On the color side of the equation, there are adjustments for color balance, saturation, and so on.
Now, you can perform all of these adjustments on the image itself, or you can do it on a copy of the image that you make in a new image layer. But, Photoshop provides one further scheme. You can do the adjustment in an adjustment layer. Adjustment layers are special layers which do nothing but specify a transformation of the data layers that lie beneath them in a Photoshop document. The final bits you see on the screen are the result of taking the original bitmap data, pushing it through all the adjustment layers, and calculating the resulting bitmap dynamically.
The fact that the adjustment layer contains no actual data is a subtle but important point. While you can simulate the effect of a single adjustment layer on top of a single image by just making a copy of the original layer and adjusting it directly, you cannot use the same trick to simulate multiple adjustment layers that have been composed together.
Adjustment layers also provide one further important advantage over direct editing. While the adjustment layer stores no data, what it does store is the actual parameters of the adjustment that you made. So, if you make a curves layer, and you decide later that you got carried away, you can go back and edit the curve that you specified originally and back it off. Therefore, in their simplest form, adjustment layers are like a digital version of the little notes you make to yourself when making a black and white print about what exposure and filter to use. Except that they also provide a real time preview of the exact result of their actions. In other words, its a complete darkroom notebook that operates directly on your images for you. This is the first piece of major magic behind adjustment layers. An adjustment layer is a persistent, yet non-destructive specification of what you did to edit your image.
Example
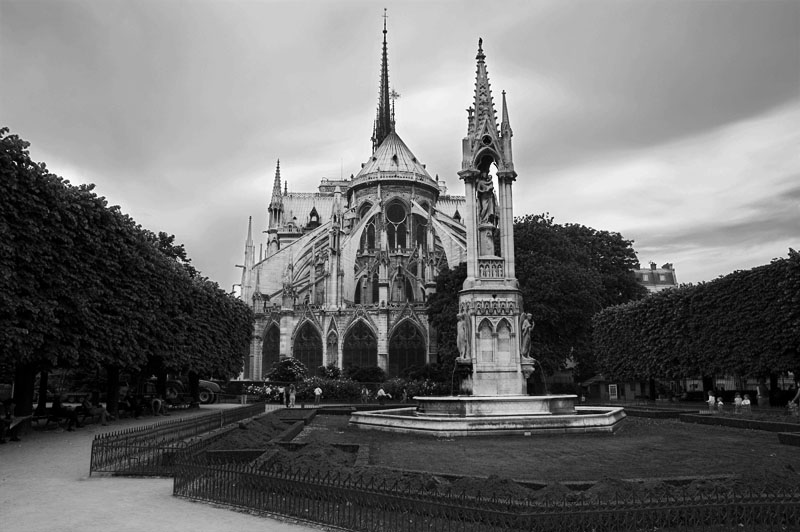
Let’s start with this pedestrian snapshot of Notre Dame. I’ll go through the layers I used to make the picture look cooler. You can judge for yourself whether the end result is worth it. The original image, with no adjustments looks like this:

The first thing to do is to add a single adjustment layer that provides an overall adjustment of tone and contrast. This screen shot shows the adjustment layer I used (click to see a larger version):

The layer that is highlighted in blue is the overall curve. Whenever I decide I want the picture to look different, I just open up this layer and fuss with the curve. In general, you would probably use multiple global adjustment layers to deal with levels, contrast, color balance and so on.
Masking and Local Adjustments
At this point you are thinking, all of this is well and good, but what if you want to just burn the corners of a print, or just dodge that one shadow in the lower left hand corner there?
The answer to this problem is layer masks.
Each adjustment layer can store not only the adjustment to be made to the underlying image, but also a mask which specifies which pixels in the image the adjustment should affect. The simplest mask is a black and white image. White pixels are touched by the adjustment and black pixels are not. You can see the effect of this by selecting some subset of the image and creating a simple adjustment layer. When you look at the layer icon in the layers window, you will see that next to the adjustment icon is another box containing a tiny bitmap. This black and white bitmap corresponds to the selection that you made. White pixels are selected and black pixels are not. The adjustment in the adjustment layer will then only be applied to the white pixels in the mask.
But wait, there is more! The bitmap that makes up the layer mask actually stores 8-bit grayscale values. This means you can manipulate not only where the adjustment in the layer happens, but also the intensity of the adjustment at any given pixel. If a pixel in the mask is not all the way black or all the way white, then the percentage of the gray value determines how much of an effect the adjustment layer has on that pixel. The more clear the pixel in the mask is, the stronger the effect. Essentially, the layer mask is like a transparency value. The more transparent the mask, the more evident the adjustment in the layer is. Since transparency is also called alpha in the lingo, you will sometimes see these masks referred to as alpha masks or alpha channels.
This transparency behavior is the second piece of major magic behind adjustment layers because they allow you to effectively blend effects together the way you would by feathering your dodging and burning in the darkroom. Rather than waving a piece of cardboard around in the dark, you take your selection mask and blur it around the edges. In each case, you get a smooth transition from areas that are affected by the adjustment to areas which are not.
Example
In this more complicated example, we’ll see how to use layer masks to adjust the contrast in the body of the church and to do some general adjustments.
This screen shot shows the curves layer I used to make the church not look so gray and washed out:

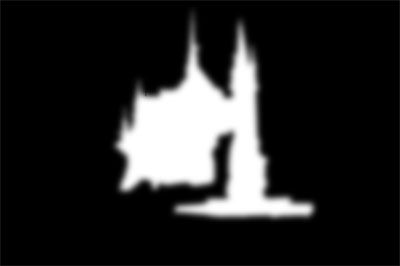
The curve itself is a slight adjustment to make the contrast slightly higher than normal. The icon for the curves layer shows a small mask next to the curves adjustment itself. To make the mask, I used the magnetic lasso to select the body of the church and then edited the mask by hand using the quick mask mode. To use quick mask, select the adjustment layer then open the Channels tab. Click the eyeball next to the layer mask and a red overly will appear on top of your image. The red areas of this overlay correspond to the black parts of the mask, while the clear parts of this overlay represent the clear parts of the mask. You can use the paint tools to add or remove red “ink” to change the shape and transparency of the mask.
After you get the mask pretty much right, you can blur the edges. In the Channels tab, click off all the eyeballs except the one for the mask itself. You’ll be left with a black and white image. Now just do select-all and a Gaussian blur filter to blur the edges of the mask as much as you want. Play around until you get the adjustment to blend the way you like. Here is what the final mask for the adjustment layer on the church looks:
In the Photoshop file for the Notre Dame picture, I have a total of 3 masked adjustment layers that do various amounts of selective dodging and burning. The following screen shots show the other two.
One for burning the sky:

And one for making the foreground slightly darker:

Each of these two layers uses a blurred mask for blending.
After all that, here is the final picture:
My overall workflow for dealing with images that need finer adjustments is to load the initial image into Photoshop and then create multiple adjustment layers. The first batch deal with global adjustments and the second batch deal with local adjustments. Local adjustments take longer to do because they inevitably involve masks, and it takes practice to make masks quickly. The adjustment layers provide a handy reference to exactly what I did for most of the major manipulations in the picture and also provide a handy repository for all the masks. There is nothing worse than needing to rebuild a complicated selection.
Of course, there are things that you cannot do with adjustment layers. You can’t do any direct editing, so things like the healing brush and simple sharpening are out. But, almost everything you ever need to do to a picture that has some direct analog in the darkroom world can be simulated using adjustment layers. So if your background is in darkroom printing, you should learn all you can about this technique. I can’t stress this enough: it’s like having a darkroom notebook that also remembers exactly how to edit your pictures for you. It really is magic.


Cool article. I’ve not done much with photoshop because, well, I know next to nothing about using it (or gimp, really–probably the most advanced image editing I’ve done has been in xv). This shows some of the possibilities for something that can be done when you really think you’ve got an interesting subject.
Since how much sharpening you do is so dependent on what device the photo is intended to be output on, I generally don’t even save sharpened versions of the file in photoshop format. What I’ll typically do is make whatever adjustments I need to make, save the (unflattened) photoshop image.
Then I’ll do noise reduction on whatever parts of the image need it, if any, sharpen whatever needs it, if any, and save a JPEG of that for output. I might save any masks I use to do that, though. My sharpening workflow is generally pretty mechanical, so if I need to redo this over, it doesn’t take more than a couple of minutes.