
Back when I used to print in the darkroom I had a little green notebook that I used to keep track of what I had done. If I made a worthy print of a given negative, I’d write down the roll the negative came from, the frame number on the roll, the paper I used, the contrast settings I used on the enlarger, and any particulars of how I dodged and burned the various areas of the picture to get the look “just right.” The theory was that if I needed to print the picture again I’d have a point at which to start working.
With digital processing techniques, I generally don’t need a log book like this. I can just open the file again in Lightroom or Photoshop and the software will have kept all my settings for me. But, once in a while this is not enough.
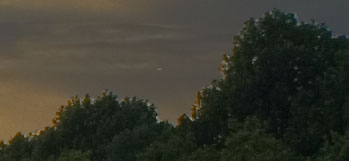
A couple of years ago I made what is now a favorite picture in Paris. The one with the boat on the river at sunset:
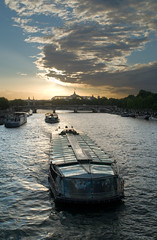
I made this picture by combining two pictures. One was very dark, but kept detail in the sky.
One was very light, but kept detail in the boat.
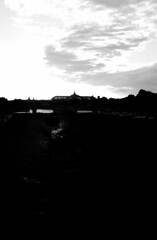
I combined the two pictures together as layers in Photoshop. The bright one was on the bottom. The dark one was on top. Then I made a mask that hid the dark parts of the dark picture that I didn’t want and let the bright parts show through. The mask looks like this:
I had all this information in the Photoshop file that I kept with this picture in it. So I knew at least in principle how I had done it. But when I tried to apply the same technique on some recent pictures I kept failing over and over again. I realized that I could not remember how I had made the mask.
There were two aspects of this mask that vexed me. First, it is in almost perfect alignment with the elements in the pictures that it is meant to mask off. Second, the mask itself seems to be a composite of the light and dark pictures. It’s almost as if I combined the pictures together to make the mask so I could combine the pictures together.
After playing around with this for most of a weekend, I finally think I know what I had done originally. The first, and most important step, is to the use the Photo Merge feature in Photoshop to merge as a first step in combining the shots. It turned out that I was shooting these pictures hand held, and so even the parts of the picture that did not move are not in perfect alignment because I moved the camera between shots. My first 15 attempts at masking were foiled because the normal hand alignment of the bits was not precise enough for the final picture to look clean.
As a side note, if you look at the composite carefully you can see that it in fact is not nearly perfectly aligned but it’s a lot better than you can get by hand. I can now see these flaws in the print, and it will bug me a lot because I have a disease.
OK. With the layers aligned, making the mask is easy. First, add an all white mask to the dark layer. There are a few different ways to do this depending on which Photoshop you are running. Recall that this mask is a 8-bit grayscale layer. You can edit this layer by opening the Channels pane in the Layers and Channels inspector and then clicking the eyeballs on and off until all you see is the alpha channel that the mask lives in. You can edit the mask using all of the bitmap tools that Photoshop provides including the drawing tools, copy and paste, and so on. Areas of the mask that are white or light colored reveal the picture underneath them. The parts of the mask that are black or dark block those bits of the picture from being visible. We have started with an all white mask, so right now all you can see is the top layer, which has the dark picture in it.
Having created the empty mask, use the magic wand tool to select all of the sky, following the outline of the trees. This will work well because of the high contrast between the tree and the sky. Copy those bits out of the light picture and paste them in the mask. This will make the sky part of the mask mostly white and very light gray. In this form, the mask will mix the dark clouds in the top layer with some of the light colors from the light layer.
Next, go back to the dark layer. Use Load Selection to load the selection from the layer mask. Then invert the selection and copy the dark bits from the foreground of the dark picture. Paste those in the mask. Now adjust the darkness of the dark part of the mask so that it blocks out what you want it to block out. Voila you are done. The resulting mask reveals the sky part of the dark picture but blocks most of the dark bits.
Note that this will only work well if you have a large expanse of white sky that is easy to select. In a sense, I got lucky because the contrast in the original scene was so high.
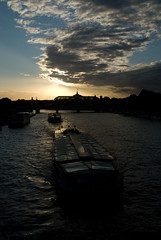
Of course, these days you can just buy some off-the-shelf HDR software to do all of this work for you. You push a button, adjust some color settings and get this:

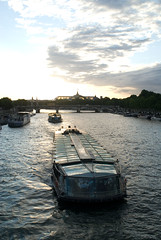
Note how the automatic merge is also better than mine. It brought some of the warm light from the foreground of the dark shot into the final picture, which I did not do. It also aligned the mask with the trees much better than I did. Here is my work blown up to 100%:
Here is what the computer did:

The software I used is called Photomatix and it seems to be a bit more intuitive to use than the built-in HDR merging in Photoshop. I have not been able to figure out how to do the final color corrections in Photoshop so the picture looks “normal” instead of freaked out. But Photomatix seems to do a good job.
So there you have it. In the end, I found both my original answer and a better solution to the original problem. If any of you Photoshop wizards out there have an even better scheme for doing this, let me know. Next time I try this I want to be more prepared. Or, maybe I’ll just learn how to use ND grad filters.


