
In our previous installment I chronicled, in horrific detail, the steps I took to gently re-enter the world of astronomical observation. At the end of the episode, our dorky hero had become proficient with the modern telescope and its associated tools. Having gained this comfort with the tools, I took the next step and ordered my camera.
Having received the camera and used it for a while, I thought I’d try to fill a small hole in the Mallincam literature: the lack of a comprehensive tutorial. So here I’ve tried to tie together a lot of the disparate reference material and user manuals come with the camera and which are also on on the Internet in various forms. To do this I’ve drawn on the knowledge and experience of many people, especially all the guys (Rock, Don, Chris, Jim and all the others) at the Night Skies Network. I got the idea to write this after Don did an impromptu video presentation of this material one night on the web site.
So first we should review exactly what a Mallincam is. We should do this because the web sites that sell it, while enthusiastic, are not altogether clear about exactly what the device does, and how it is different from other imaging systems.
The Big Picture
Back in the old days, if you wanted to see more than was possible with just your eyeball and a telescope, you could attach a camera to the scope and take tediously long exposures on photographic plates or small pieces of film. Film, sadly, has limited sensitivity, which meant that if you wanted to pursue this line of work, you were often doomed to sit in the cold for hours gently babysitting your telescope as it erratically tracked the heavens.
When semiconductors and computers came along, astrophotographers were freed to capture light onto much more sensitive CCDs and also to use a computer to gently babysit the motion of the telescope. Still, since they are an odd bunch, the imagers were still happy enough to sit by their machines for the same long hours collecting data, and creating ever more fantastic pictures on their computers after the fact.
What was missing was a way to see more without all those hours of work. This is where the Mallincam and cameras like it come in. The Mallincam is an extremely sensitive CCD video camera that can also take relatively long exposures of deep sky objects. Its hybrid of CCD imaging hardware combined with real time video output lets you take time exposures without all the bother of digital image processing. The camera does that work for you so you can look at the object in the telescope.
Here is how it works: you attach it to your telescope on one end and a TV on the other. You tell the camera to expose for some number of seconds (mine can go from three seconds to about two minutes). Then, after each exposure period, a picture of what the telescope is pointing at appears on the screen. This picture stays on the screen until the next exposure, or integration is complete, at which time the screen refreshes and you get another image. And so it goes.
You don’t need a computer. You don’t need any image processing software. With 15 to 20 second exposures you can see more than you ever would in an eyepiece, and yet the whole experience is fairly close to real time. It’s important to emphasize that this represents a rather novel new way of working in astronomical observation. It’s similar to visual observation in you generally work in almost real time. But, it’s also similar to digital imaging since the camera can capture so much more than you can see, especially under suburban skies. I think it is this hybrid nature that makes the Mallincam (and the similar Stellacam, described here) such an exiciting new class of astronomical devices.
Anyway, let’s walk through how it works. What I’m going to describe below is the basic usage of the Mallincam VSS+ camera. Rock Mallin actually makes four different models of video cameras. There is the Junior, the Hyper Plus, the VSS+ and the new Xtreme. You can check out his web site to work out the differences between all the models.
This tutorial also concentrates on the direct on-camera control interface. I prefer to control the camera directly rather than use the Windows software to do it. Using this information it should not be hard for one to figure out what the same settings mean in the control software. Also, the VSS+ is similar but not identical to the newer Mallincam Xtreme. I’ll point out some differences at the end.
Focal Length and Image Size
Before we get into how the camera works we have to deal with the issue of image size. The sensor in the Mallincam is pretty small. It’s a so called “1/2″ size CCD. No one really knows what this means, except to say that the chip is small. 8 inch Celestron telescopes have a pretty long focal length, and if you just stick the tiny CCD at the end of the tube, it is not going to see much of the sky at all.
Luckily there is an optical trick we can play. If we stick an extra lens, or lenses in front of the camera that focuses the cone of light coming from the telescope more quickly, then we can reduce the effective focal length of the telescope. This has two effects. First, it makes the tiny chip cover more sky. Second, it allows us to take shorter exposures, since the rule we learned from camera exposure still applies here. A shorter focal length means a smaller “f-ratio”, which means faster pictures. There are various devices that can be used to perform this magic. Rock Mallin makes two reducers specifically designed for his cameras: the MFR-3 for Newtonians and the MFR-5 for SCTs. I picked up an MFR-5 and use it in a configuration that reduces the focal ratio of my telescope from around F10 to around F4. This turns out to be a pretty good general purpose image scale. Most objects are neither too large to fit nor too small to be seen at all.
We could actually spend an entire article discussing nothing but the mechanics of focal reducers. But I’m going to leave the rest of the details alone for now.
Camera Basics
Now we are set to figure out exactly how to use the camera you just bought. The camera comes with a short manual with tiny screen shots describing various menu systems containing many strange words in all-caps.

Alternatively, you can use a custom piece of .NET software to set most of these same parameters (still named in all-caps).

Luckily, the relative obscurity of these three letter acronyms covers up what is a fundamentally simple mechanism. There are four basic parts to the Mallincam engine.
1. The exposure engine. The good news is that the camera can take exposures from 1/12000th of a second to several minutes. The bad news is that there are three menus that you have to navigate to make it happen. I will discuss these menus below. The relevant acronyms are ALC/ELC, SENSE and SYNC.
2. Amplifier Gain. This is called AGC.
3. Other image processing parameters like white balance, gamma, and something akin sharpening (APC).
4. Cooling. Cooling is controlled using the MOTION DETECT menu. Even though it has nothing to do with motion detection.
Exposure
Probably the most confusing and somewhat byzantine aspect of the camera is how the exposure systems are interlocked. There are, sort of, three exposure systems in the camera, and three menus to control them.
Recall how the main menu of the camera looks:
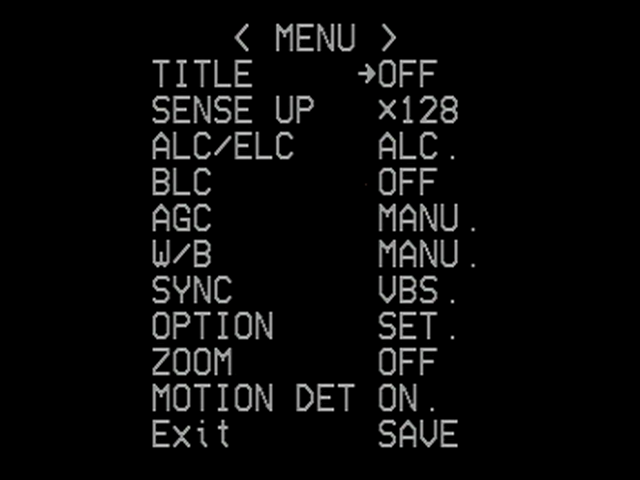
The SYNC setting determines whether you are in (essentially) in short exposure mode or long exposure mode. The short exposure mode is for integrations up to 2.1 seconds. To set this you set your SYNC to VBS:

Now you can set the exposure time two ways. The ALC/ELC menu is for setting the shortest exposure times. If you are going to use the camera for very bright objects like the moon or planets this is what you use. To use ALC, you use the little buttons on the camera (or the auxilliary control box, I’m not a masochist) until the arrow points to the “ALC/ELC” menu:

Then you hit the center button to get into the settings screen. Here I have the shutter off:

And here I have the shutter speed at 1/1000th of a second:

In addition, you set the SENSE menu to OFF. We’ll talk about the SENSE menu later:

Shutter speeds range from 1/100th to 1/12000th of a second. In earlier cameras, the level bar also affected the exposure of the final image, but I don’t think that setting has any effect in the VSS+. I don’t use the ELC mode at all, so I’m not going to tell you how it works here.
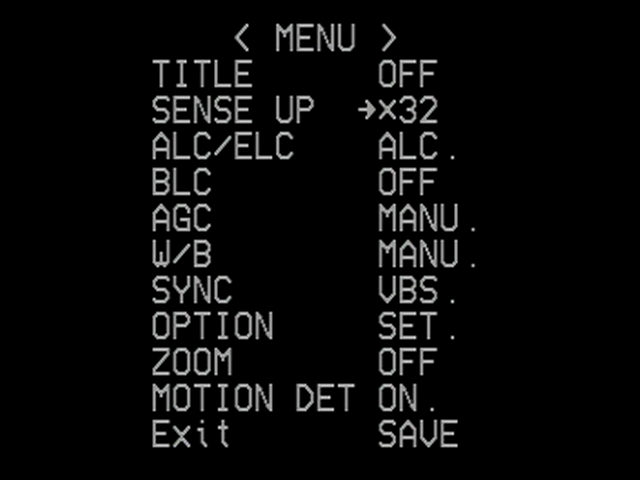
If you set the ALC shutter to OFF you enable the use of the SENSE menu to set longer exposures of up to 2.1 seconds. In this mode, the final video frame is generated by integrating multiple frames together. The exposure time is expressed as an even multiplier whose value is between is between 2x and 128x. Here we have it set to 32x:
and 128x:

At 128x, or 2.1 seconds, you have enough exposure to see most of the stars you would see in an eyepiece and some of the brighter deep sky objects.
Finally, the SYNC setting controls whether you use the extended exposure engine, which is also called “Hyper” mode.
You turn on hyper mode by doing three things:
Turn off the ALC exposure mode:
Set SENSE UP to 128x:
And then set the SYNC to INT:

At this point, the exposure that the camera uses is controlled by the little knob on the side. Every time a new frame is ready, a yellow light on the back of the camera will blink. You can use this light to figure out what your exposure is. When you turn the knob all the way counter-clockwise and you get a 3 second exposure. Turn it all the way clockwise and you get 56 seconds.
Finally finally, if you set SYNC to LINE, the exposure set by the knob is doubled:

Isn’t that simple? Having covered how the engine works, the instructions that come with the camera now make more sense. For example, there is the sheet that tells you to set the menus this way when you turn the camera on at the start of the night to set up:
SENSE = 128x
ALC = OFF
SYNC = VBS
What this means is “take quick 2.1 second exposures”, which is exactly what you want for initially setting up and aligning your telescope.
Meanwhile, for lunar and planetary work, the cookbook settings are
SENSE OFF
ALC = 1/100th to 1/12000th (probably around 1/1000th).
SYNC = VBS
This sets the camera up to fast exposures on bright objects.
Finally, for bread and butter deep sky work, you set the camera up like this:
SENSE = 128x
ALC = OFF
SYNC = INT
Then the knob controls the longer exposure times for dim objects.
In practice, I hardly ever take the camera out of “deep sky” mode. I just turn the knob all the way back and flip the SYNC back to VBS when I shut down for the night so I have fast exposures for setting up the telescope the next time out. So, before I shut the camera off I make sure the main menu screen looks like this:
And then I shut everything down and pack up for the night.
Gain (AGC)
With exposure out of the way, the next thing to talk about is gain, or AGC. Setting the AGC tells the camera how much amplifier gain you would like it too apply to the signal coming out of the CCD. It’s similar to cranking up the ISO setting on your digital camera. To get the AGC you navigate the main menu to the AGC setting and use the buttons to set it to manual:

Then you can use the secondary menu to set the gain level:

There are two rules for setting AGC:
1. Set it as low as you can. Lower AGC will give you cleaner pictures at the expense of a longer exposure time. Higher AGC will let you use shorter exposures at the expense of more noise. Where you set this depends on how well your telescope can track and how long you want to wait for new pictures. I generally just put it close to the middle except for short exposure work, where you just turn it off.
2. You cannot reset the AGC while Hyper mode is on and the camera is going an extended exposure. You must flip SYNC back to VBS, set your new gain level and then re-enable the Hyper mode. If you don’t do this, the camera can get into any number of odd states, at which time you reboot it.
Other Image Parameters
When using the Mallincam, you use exposure and gain to set a baseline for your image. But, the camera also gives you a few other settings to fine tune color balance, sharpness and gamma.
Color balance is controlled with the “W/B” menu. This menu has two automatic states and one manual. The automatic states are called ATW:

and AWC:

I’m not sure what the origin of these terms is. The manual state allows you to open up this menu where you can set your own red/blue sliders:

This menu also lets you set what I guess is tungsten (3200K) or daylight (5600K) preset white balances.
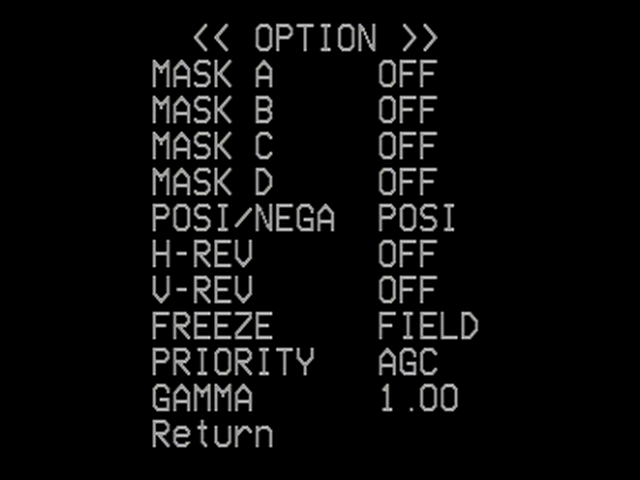
The Mallincam also has a setting called APC that lets you manipulate sharpness and the rendering of fine detail. You get to the APC menu through the options screen. First navigate to the OPTION menu and hit the center button to see this:
Then go to the last entry, and hit the right button so it says NEXT:

Then hit the center button to enter the magic second options menu:

Finally you can set the APC parameters in the APC menu off of this second options menu:

Pushing these sliders to the right increases the effect of the APC. To me, the effect is much like unsharp masking. Don’t use too much of this because it can make the image look strange and noisy.
The option menu contains several other functions that I am not going to cover here. I will note though that you might have reason to mess with the GAMMA setting. Generally for deep sky stuff you set this to 1.0 to get the darkest backgrounds. But, there is a second setting if you need a lighter picture for some reason.
Cooling
The final camera parameter that you might want to manipulate is the one that controls the cooling system. The Mallincam uses an adaptive cooler that has two parameters: how aggressively to cool the CCD and how often to check and see whether the sensor needs to be cooled. Curiously, you set these parameters from the MOTION DETECT menu even though it’s not clear what this has to do with motion detection. This menu looks like this:

The slider controls the level of cooling. The right side of the slider represents minimal cooling. As you push the slider left the cooling gets more aggressive. The timer controls how much the cooler runs. The timer has three setings: 10 seconds, 30 seconds and 60 seconds. Rock recommends that when you first turn the camera on, you set the time to 60 seconds and the level all the way right. This is a gentle level of cooling. As you use the camera more, you can set the timer to 30 or 10 seconds and the level further to the left.
If you turn MOTION DETECT off altogether from the main menu then the cooler runs all the time. I gather that you should be careful about doing this, but I don’t understand the hardware well enough to know why.
Using the Mallincam Software
I have not personally used this control program, but others have. It has some convenient presets that set the camera up for planetary or deep sky. The meat of the program is the main settings screen though, which looks like this:
All of the various sections of this form should look familiar to you now. They set most of the same things as the camera menus did above. But, if you have a computer you can do it without needing to navigate the menus on the camera. The one thing you can’t use this interface to use is to set exposure. For this you still have to use the knob on the VSS+ because it’s the only thing that is hooked up to the exposure system
There is also a new control program for the Mallincam Xtreme. In addition to the regular settings it can also be used to set exposure directly.
You can find more information about this software in this article by Jack Huerkamp. In addition, you should also read this excellent review by Jim Welisek and also this other excellent review of the Xtreme which is also by Jim.
Putting it all Together
Now we’re ready to take the camera outside. I have the following routine:
1. Set up and align the telescope as before with an actual eyepiece. I just find it easier to do it this way. My telescope does not track before it is aligned, and keeping everything centered in the camera while staring that the TV or computer screen was too nerve racking.
2. Replace the eyepiece with the camera. Hook up the power to the camera and hook up the video cable to the camera and whatever TV or computer is going to capture the image. If you are using a computer to capture the images, you’ll need extra hardware to convert the analog video to digital frames. I’ll cover that in the next article.
3. Focus. I have not talked about focus, but it’s pretty easy. First, buy a Bahtinov mask and read a web page on how to use it. Put the mask on your telescope. Put the camera into the 2.1 second exposure mode and turn the focus dial until the diffraction pattern on the screen looks right.
If you don’t have the mask, focus on a bright star or better yet, a bright cluster of stars. As you come towards best focus you’ll notice dimmer stars will being to appear in the field. A good indication that you are close to focus is when no more dim stars appear, but none disappear either.
4. Point the telescope at something interesting. Right now The Orion Nebula is still conveniently visible. The screen will show you if the telescope pointed well. Use the hand controller to center it, then put the camera into Hyper mode. Remember the SYNC setting:
Wait 5 seconds. You will then see more on the screen. Turn the exposure knob clockwise a bit. With a 10 second exposure in my 8 inch SCT, I got this:
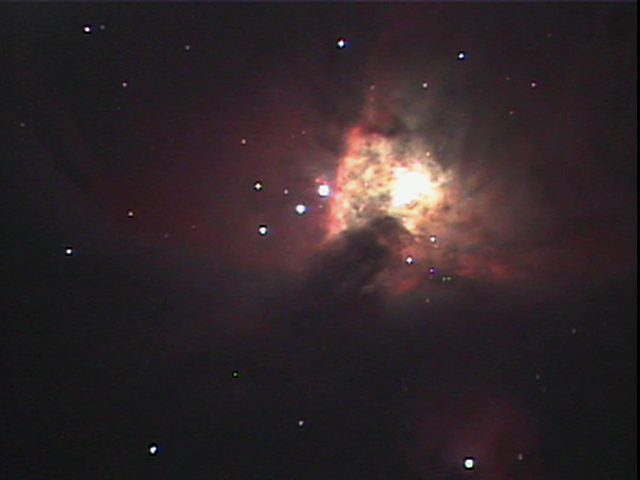
I have to say that this made learning the odd interface worth it.
Next time: All the other little details, and how to spend the rest of your yearly income to defeat periodic error.
Appendix and References
Most of the material presented here was inspired by a short tutorial session that happened on one of the NSN broadcasts one night. After watching that I figured it would be fun and useful to record the most important classes of menus settings that you can make on the camera.
As I said above, my camera is the Mallincam VSS+. It is slightly different than the earlier MCHP (Hyper Plus) model and the newer Xtreme model, but the main differences are in how you set exposure in Hyper mode. For the MCHP, all the camera menus are the same except for the cooler, and you set exposure (and cooling) using switches on the body of the camera. For the Xtreme, all the camera menus are the same except the VBS SYNC mode is never used and you set exposure using either the Windows software that is specific to the Xtreme or using a wireless remote control.
Much of what I covered on this page is also covered in one place or another in the various documents that you can download from Jack Huerkamp’s web site. Jack is US distributor of the Mallincam, so if you are buying a camera in the states you’ll be dealing with him.
I also recomment looking at the reviews of the VSS+ and the Xtreme on Cloudy Nights.
Finally, the Mallincam Yahoo group has a lot of useful reference information as well.


This is a great addition to my growing experiencxe with the Mallin. Keep it up! You are a wonderful resource. Be sure to keep in informed on aadditional articles
You are the Boss
You are quite right,listening to Jack and Chris and Don all these things are covered but you have demystified it
Thank you very much for your efforts and I look forward to your further posts
Dr Dave
6/4/2011
Thank You for the greatly informative article on the MallinCam. I have ordered my MallinCam, paid the down payment, and await my name to come up on the list, for purchase. I will be using it with an 18″ f 3.5, built by Tom Ospowski of “Equatorial Platforms”…Your article will be my MallinCam Bible which I shall keep close by my side……Thank You for putting in the time, helping newbees like me learn how to use my MallinCam………….Travelenfree
I opened the v2.5 software next to this article and was able to surmise the similarity between VSS and my Xtreme. In particular, the Hyper block is replaced by an Integration block. I find no explanation of the 6×8 array next to DEW REMOVAL. All in all, your article was one of the most helpful yet and I look forward to a next episode in deeper detail.
I would like to find details of the Xtreme’s chip: array size and pixel size, so I can use Ron Wodaski’s New Astronomy Press CCD Calculator that shows image scale for many popular deep-sky objects.
I have Jack’s downloads, if fact, all the referenced links to study. I got the Xtreme, MFR-5, heat dissipator, Speco monitor and cables in new condition from a club member who decided to go full-blown CCD imaging instead. I’ve taken first baby steps: found the right COM port and got color bars! Camera’s not on any of my scopes yet (80mm APO to 12″ LX200GPS) but the “sky” in my basement is as good as outdoors… weather’s been awful. Heard NSN for the 1st time last night. This is a new direction for my hobby.
John Deriso
Librarian – Northern Virginia Astronomy Club
Thanks for the great article! I’m just starting out in any kind of astrophotography.
Do u have any tips for using a refractor? I am using a TV np127.
Ross