
We had folks over for one of our periodic Chinese dumpling parties. The food came out particularly well this time, and I managed to use my nifty Panasonic LX-3 to take pictures of some parts of the process. So here is an updated and hopefully slightly more useful version of the reference recipe.
It’s best to have a good system for this. So I’ve broken the recipe up into stages.
Dough, Stage 1
1. Start with 2-3 cups of flour and one cup of cold water.
2. You must use crappy bleached bad for you Pillsbury all purpose flour. The fancy-ass organic whole wheat stuff will make you crappy dough. Trust me.
3. Put most of the flour in a bowl. Add 3/4ths of the water but not all and stir it around with chopsticks.
4. If the flour does not soak up all the water, add flour. If it is too dry, add water. Stir some more, check again. Turn the mixture out on to a board and knead it until it holds together. Don’t worry about making the ball smooth.
Obviously I can’t tell you how to tell when the dough is right. That is what you need my mom for. But, what you are after is a dough that is pretty stiff, but soft enough to still be workable. It should take some work to poke it with your finger, but it should eventually bounce back. And, there should be enough moisture in the dough to hold it together. The rest time in the fridge will relax the dough and even out the wet, making the dough softer when you finally work with it.
Having had more experience with this, I think it might work better to measure the flour by weight to try and get a more consistent behavior. But we have not experimented with this yet.
5. Put the ball into a ziploc bag and stick it in the fridge for a few hours.
6. Pull the ball out of the fridge. The dough should be stiff but flexible. Knead it around a bit, adding flour if it is sticky. Put it back in the fridge for a few more hours.
Unfortunately, I didn’t get any photos of making the dough. Make two balls to use up the filling recipe below.
Filling, Stage 1
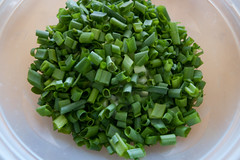
Start with about a pound of ground pork. Now chop up one bunch of scallions, mostly the tops. You do this by first slicing them the long way, then collecting up the pieces and chopping them the short way. You want it to be about this size:
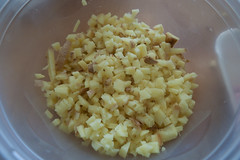
Now chop up some ginger the same way. Make about a half a cup of it. You won’t use all of it, but it’s good to have extra just in case. You want the ginger to be about the same size:
Finally, do the same for a head of Napa cabbage. You can use a food processor to finish to job if you want.
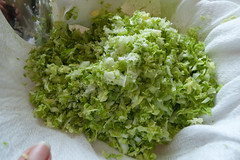
Salt the cabbage and twist it in cheese cloth to squeeze the juice out of it. You want the cabbage to be as dry as you can make it. Save the juice in a bowl.
Now collect all your ingredients together:
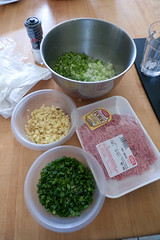
Put the pork and a bowl. Add a pinch of salt and some ground pepper. Then add about a tablespoon of soy sauce. Mix this together along with a couple of handfuls of the scallion and as much ginger as you can stand. I used to put in sesame oil at this point too, but decided that there was no point in that. Mix the meat and veggies together with a fork or two chopsticks until you have broken the meat down a bit, like this:

I usually use the smell and look of the meat mixture to figure out how to adjust the ingredients. After the initial pass I usually add a bit more soy and some more scallion.
Now set this side and start to get the dough ready for filling.
Dough, Stage 2
Get the dough out of the fridge about an hour before you start to work in earnest. Cut the ball into three pieces and roll each out into a long string about 1/4 inch in diameter. Then pull pieces of dough off this string by hand. Each piece should be maybe 1/2 an inch long. You can use a dough blade or a knife for this, but after you get good at it the pulling method is easier. If the dough is right the pieces should come off with a loud snap. Now squish them into small rounds with the heel of your hand, so they look like this:
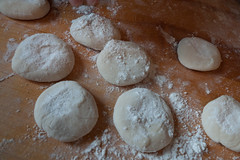
Each round should be around a half inch to an inch across. Do one “rope” at a time. About the time the first rope is done, finish the last stage of making the filling.
Filling, Stage 2
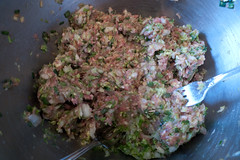
Now finish the filling by adding the cabbage. You want to add the cabbage last and then assemble immediately. The reason you want to do this is if you add the cabbage too soon and then let the meat sit, it will fall apart later. So, for one pound of pork add about 2 to 3 cups of the chopped cabbage from before depending on how much you like. Mix it into the meat. Then add a few tablespoons of cabbage juice. You want to get the filling to be a moist paste, but not too wet. So add the juice slowly until you get a feel for when the filling is right. It should look like this:
Now you are ready for assembly.
Assembly Line
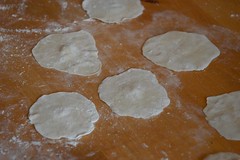
First, you have to roll the skin out. Take one of the little rounds you had before and a small rolling pin. The best kind of rolling pin is made by cutting a broomstick-sized dowel into a pin about 6 inches long.
Get a lot of flour on the dough, the pin, the board, and your hands. Roll the dough from the edge into the middle. Then turn it 30 degrees, then roll it again, then turn, repeating until you’ve spun it round once or twice. You want to roll it about as thin as those frozen wonton skins. Those are a good reference, so buy some, but don’t use them for dumplings, or I’ll have to beat you. They suck.
The goal is to have the middle of the skin be a bit thicker than the sides, so it can support the filling. Like this (thanks to The Cookworm for the photo):
Perfect roundness and uniformity of size is not important. The guy filling the skin can fix that in post.
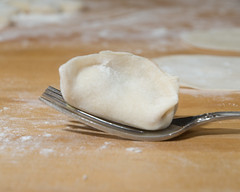
Assuming you are right handed, here is how you fold the dumplings: take one of the rolled out skins and hold it in the palm of your left hand face up. Put a small amount of filling in the middle. Now with your right hand, pick up the skin in the “middle” and fold it over the filling and pinch it together on the other side. Then turn the thing over to the left, pinch the left ends together, and work your way back to the middle. Then do the same thing from the right end. When you start at this, you usually end up with something that looks like a ravioli. But, with practice, you’ll get stuff that looks more like a pot sticker and can “stand up”.
When my mom makes these, she can supply three or four fillers with enough skins to keep busy. You will be slower (until about 40 years from now). So balance the number of rollers and fillers according to the talent you have. At our get togethers I can usually fold fast enough to keep up with 3 or 4 of the “guests” who we have enslaved.
When you get one filled and folded, it should look like this:
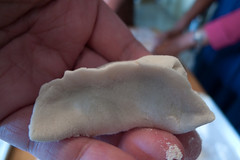
Or, if my mom has made you a perfectly sized skin:
Take the filled dumplings and put them on a tray. I like to use sheet pans with floured wax paper. Don’t let them sit around too long before cooking. An hour or two at most. Anything you don’t cook should be frozen on the trays, then put into freezer bags.
Cooking
To make the boiled dumplings, fill a large pot with water. Bring to a boil. Drop the dumplings in one by one. Cook until they float, then a couple of minutes past or until you are sure the pork is cooked through.
Pot stickers are trickier, but more fun, to make. Get a non-stick frying pan on medium heat. Add some oil and lay out the dumplings like this:
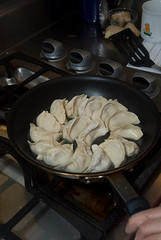
Mix 1/4 cup water with 2 dashes of vinegar and pour it into the pan. You want enough liquid to steam the tops of the dumplings for a bit, but not so much that they cook in it. If the liquid doesn’t dry out, you won’t get crunchy bottoms.
Cover and cook about 10 minutes. With practice you’ll figure out how long to cook them to get the nice burnt bottom that gives the dish its name.
If you get really good you can turn them out on to the serving platter in one piece:

People love that sort of flourish.
Pot stickers are great fun, but the truth is that the boiled ones are better. You get the soft chewy “pasta” followed the meaty filling followed by the crunch of the vegetables followed by the yummy cooking juices. There’s nothing like it.
Serve these with soy sauce, vinegar, sesame oil and hot sauce. Your guests can mix these however they want for dipping. Or you can eat the things plain.


